Uncategorized

Comb Ceramics (ESTONIA)

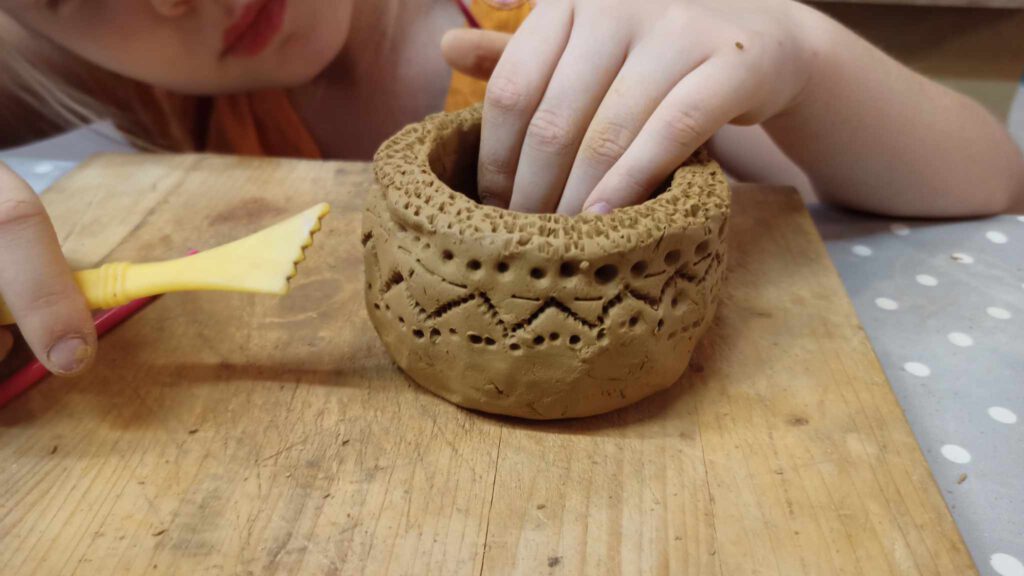
In this workshop we learned the history of Comb Ceramic type of pottery. In the hands-on process we first chose the type and colour of the clay. In ancient times the clay was dark red or brown, depending on the heat of the fire and the type of the clay.   First, we learned how to prepare (wedge) the clay. This means kneading it, kind of like kneading dough, to get rid of air bubbles and make it nice and smooth, because if there are air bubbles, the clay could crack when it’s fired. Next step is shaping the pot. There are a few ways to do it. One way is to start with a ball of clay and use the thumb to make a dent in the middle, then pinch the sides to make the walls of the pot. Another option is to roll the clay into long, thin ropes, and then coil them on top of each other to build up the walls.   Exciting part is creating the comb pattern. We used actual combs and other tools with teeth or edges that can make interesting marks in the clay by pressing the tools into the soft clay to create lines, zigzags, or other designs. Experimenting with different pressures and angles will make different unique patterns. Next step is to let the pots dry. This is very important. If the clay is too wet, it could crack when it’s fired. The final step is firing the pot in a kiln, which is like a very hot oven. This hardens the clay and makes it into ceramic. This is a step that is usually done by the teachers, due to the high temperatures involved. Learning about ancient pottery helps us understand how people lived long ago. The Comb Ceramic culture, also known as Pit-Comb Ware was widely distributed in Estonia, already from 3900–1750 BC. Pottery from that time often had pointed or rounded bottoms, perfect for storing food and liquids. For decoration, comb-like tools were historically used for decoration. The patterned decoration, or “writing,” may have been intended to ward off evil and protect food. Families or communities had different patterns and also represented the wealth of the family or tribe.  Children enjoyed the workshop and found it a calming and relaxing process combined with fascinating stories from the past traditions.    

Comb Ceramics (ESTONIA) Read More »

Shingle Roof Workshop (ESTONIA)

In the workshop, we learned how to craft a roof from natural wood shingles. The children got to try their hand at cutting and installing shingles themselves. The instructor demonstrated how to place the shingles at the correct angle to make the roof watertight. We used traditional tools like hammers and nails to securely fasten the shingles. Each child built a small model roof that they could take home. We learned which types of wood are best suited for a shingle roof. We talked about how a shingle roof changes over time and what maintenance it requires. Through a fun game, we learned the different parts of a roof and their names. Together, we admired the beauty and naturalness of the finished shingle roof. The children left the workshop with new skills and knowledge of traditional crafts. In Estonia, shingle roofs have a long history, being a traditional roofing material, especially in rural areas. The skills of building shingle roofs have been passed down from generation to generation, thereby preserving a valuable cultural heritage.  

Shingle Roof Workshop (ESTONIA) Read More »

Giochi tradizionali di Legno (ITALY) Part I

Alexander proposed the realization of the game of 15 which is a classic puzzle game created in 1874 by Noyes Palmer Chapman, a letter carrier on duty in Canastosa, and popularized in 1891 by samuel Loyd.The game consists of a square-shaped board, usually made of plastic or wood, divided into four rows and four columns (thus sixteen positions), on which are placed fifteen square tiles, numbered progressively from 1. The tiles can slide horizontally or vertically, but their movement is limited by the existence of a single blank space. The aim of the game is to rearrange the tiles after “shuffling” them randomly; the position to be reached is the one with the number 1 at the top left and the other numbers following from left to right and from top to bottom, up to 15 followed by the empty square. The children began by squaring the wood to be cut through the use of a carpenter’s square and marked with pencil all the dowel cuts needed for the game. Afterwards, Alexander explained and showed the correct use of the hand saw with which all the boys cut the 15 dowels. After cutting, the dowels were sanded with sandpaper of different weights, first a larger weight was used to remove impurities from the larger cut wood and then finished with a much finer weight. At this point we got 15 squares sanded and ready to be painted by the children, each with their own imagination, where the numbers one to fifteen were made. Same procedure to make the game frame, first they did the cutting, then the sanding and finally the painting. We prepared all the materials needed to assemble the game and put them together. 

Giochi tradizionali di Legno (ITALY) Part I Read More »

Etruscan Jewellery Part IV (ITALY)

In the last meeting of the Erasmus Plus HAND! project, held at the Albero della Tuscia Libertarian School in Farnese (VT), elementary school children concluded the course on Etruscan crafts by making a plaque pendant depicting the Etruscan Chimera.Before beginning the hands-on activity, the children learned about the history and significance of the Chimera, a mythological creature depicted with a lion’s body, a goat’s head on its back and a snake-like tail. Among the most famous depictions was shown the Chimera of Arezzo, a fifth-century B.C. bronze sculpture found in 1553 and now housed in the National Archaeological Museum in Florence.In Greek mythology, the Chimera is a symbol of chaotic and destructive forces, but in Etruscan art it may also have taken on a meaning of protection and divine power. Its connection with the otherworldly world and its depiction on votive objects suggest a connection with the spirituality and religious beliefs of the Etruscans.After the introductory part, the children began the creation of their pendant, following the techniques learned in the previous meetings and using the technique of embossing on metal. To make the process accessible to all, the children were given a stylized, line drawing of the Chimera, which they transferred to the copper plate by overlapping the sheet and tracing the outlines with a pen. This first etching was then finished with burins to accentuate details and create a more pronounced three-dimensional effect. Once the design was complete, they cut out the shape of the pendant, beveled the edges, and, to make the pendant safer and more comfortable to wear, a thin layer of hot glue was applied to the back, which softened the reliefs and covered any sharp edges. Finally, with the help of jewelry pliers, the children drilled a hole in the plaque and inserted a connecting ring, finishing it off with a lanyard.This activity allowed the children to approach history through manual dexterity and creativity. Working with metal with their own hands, they were able to experience ancient techniques and discover the symbolic value of Etruscan artifacts. Each pendant, although starting from the same design, took on different nuances, thus becoming a unique and personal piece. This meeting closed the journey with a tangible memento of the work done, transforming knowledge into a concrete lived experience.

Etruscan Jewellery Part IV (ITALY) Read More »

Etruscan Jewellery Part III (ITALY)

The third meeting of the Erasmus Plus HAND! project, held at the Albero della Tuscia Libertarian School in Farnese (VT), guided children to discover another fascinating artifact of Etruscan goldsmithing: earrings. This jewelry, beloved and worn by Etruscan women, came in different forms, from large plaque earrings, which could reach 7 cm in diameter, to pendants embellished with stones and fine details.After a historical introduction on the types of earrings used by the Etruscans, the children chose to make a pendant model, inspired by ancient jewelry but reinterpreted with a personal touch. For the workmanship, the technique of embossing on copper sheets was used, through which the spiral symbol was engraved. This motif recurs frequently in Etruscan art and symbolizes the continuous cycle of life, growth, transformation and the connection between the earthly and spiritual worlds.After transferring the design to the metal plate, the children engraved the spirals using burins and embossing tools, working carefully to achieve a well-defined relief. The resulting plaque was then personalized by adding a stone of their choice, inspired by the Etruscan custom of embellishing jewelry with precious and colorful materials. To ensure safety and comfort, a thin layer of hot glue was applied to the back, which softened the reliefs and covered any sharp edges. Next, through the use of jewelry pliers, the children assembled their earring, inserting the linking rings and completing it with the monachella, the hook that allows it to be worn.This workshop, too, offered children an immersive, hands-on experience, allowing them to explore Etruscan culture through craftsmanship and art. Working with metal, engraving ancient symbols and assembling a real piece of jewelry turned history into a hands-on experience, leaving them with not only an object to wear, but also an awareness of the artistic and symbolic value of jewelry from the past.

Etruscan Jewellery Part III (ITALY) Read More »

Etruscan jewelry Part II (ITALY)

After the exciting discovery of Etruscan jewelry during the first meeting, the children of the Libertarian School “Albero della Tuscia” in Farnese (VT) continued their journey into the world of goldsmithing, experimenting with new techniques for making two types of rings: a band ring and a plate to be applied on a ring base.Also in this meeting, guided by Marianna Iurlo, the children worked with the embossing technique, choosing between copper plates or silver-plated bases, depending on their aesthetic preferences. The band ring was decorated with a design made freehand, then traced using burins to create a well-defined relief. Someone also applied black corallines to further embellish and personalize the work.The plate of the second ring, on the other hand, was obtained by tracing the relief motif of a jewel depicting a Spiral, a recurring symbol in Etruscan art. This motif was particularly significant to the Etruscans because it represented the cycle of life, fertility and prosperity, as explained in the previous meeting.Once the relief was imprinted on the slab, the piece was treated with hot glue to stabilize the workmanship and finally glued to the base of the ring, thus completing the creation. The meeting allowed the boys and girls to hone their manual skills and deepen their understanding of the symbolic value of Etruscan goldsmithing, transforming learning into a practical and creative experience. Through craftsmanship, they were able to experience firsthand the attention to detail and precision required for jewelry making, while developing a deeper connection to the history and art of antiquity.

Etruscan jewelry Part II (ITALY) Read More »

Etruscan jewelry (ITALY)

During the first meeting of the Erasmus Plus HAND! project at the Libertarian School “Albero della Tuscia” in Farnese (VT), elementary school children embarked on a fascinating journey to discover Etruscan jewelry. The presenter, Marianna Iurlo, told the story of the Etruscans, the ancient people of central Italy known for their skill in the art of goldsmithing, and explained how jewelry was not mere ornaments, but authentic symbols of wealth, protection and spirituality.The boys and girls learned that these precious objects, made of gold, silver, bronze, amber, and semi-precious stones, were embellished with refined techniques such as filigree, granulation, and especially embossing, which allows the creation of three-dimensional reliefs on metal. During the presentation, special attention was paid to the meaning of the symbols: the Sun represented life, light and energy, while the Moon was associated with the mysterious passage into the afterlife; the Serpent represented protection and renewal, the Eagle expressed power and connection with the heavens, and the Horse evoked nobility and strength. In addition, the Circle and Spiral recalled the continuous cycle of life, fertility and prosperity, while plants and flowers engraved on jewelry suggested rebirth and abundance. Some jewelry even featured formulas or incantations, intended to protect the wearer and connect the earthly world to the divine. To make this journey through time even more tangible, photographs of jewelry found in Etruscan tombs and housed in the Vulci museum were shown, giving children a direct visual connection to the past. Next, participants put what they learned into practice by making a band bracelet. Using a copper plate, the children experimented with the embossing technique: with the help of a die-cutting machine, a relief design was imprinted, which was then refined with burins to define the details. During the making of the bracelet, hot glue was used to fill in the reliefs and make the edges of the foil less sharp, thus providing greater security. In addition, through the use of jeweler’s pliers, terminals were applied to the bead and connector rings inserted, for an accurate and professional finish.This first meeting, aimed to combine learning about Etruscan history and culture with the direct experience of metalworking, strengthening the children’s sense of cultural belonging and creativity. A course that transformed knowledge into a concrete experience, stimulating creativity, teamwork and the discovery and appreciation of the artistic and historical heritage of the past.

Etruscan jewelry (ITALY) Read More »

Musical Instruments – Part 3 (ITALY)

The third and final meeting of the Erasmus Plus Project – HAND! at the Albero della Tuscia School in Farnese (VT) took place in a serene and playful atmosphere, demonstrating how collaboration and creativity can transform recycled materials into real musical instruments. During this lesson, the children began by drawing their own ideas for instruments, letting their imaginations run wild. The preparation of the materials was guided by the conductor, but it was soon evident as the increasingly close-knit group organized themselves for a time of ensemble music, this time without the conductor’s guidance. After the musical experimentation phase, the boys and girls continued to refine the instruments, working the wood through scraping and sanding operations, and using working tools such as a drill under careful supervision. This phase allowed them to acquire new technical skills as they decorated with markers the different parts that would make up the sistrum and the two types of clap clap. In addition to strengthening manual skills, the experience fostered teamwork and autonomy, leaving each participant with an awareness of the importance of a creative and sustainable approach.

Musical Instruments – Part 3 (ITALY) Read More »

Flying Carpets (ESTONIA)

In this workshop we entered the world of traditional weaving with wooden framed looms. Estonian weaving has a long and vibrant history, with each region having its own unique patterns and styles. Weaving wasn’t just a skill; it was a way to express creativity and keep traditions alive. Patterns and designs often had special meanings and they were passed down from generation to generation. Children made carpets on small looms and bigger looms.  The process of setting up the Loom: First we got a whole bunch of threads ready. These are called the warp threads. They are like the backbone of the fabric and will run lengthwise. These warp threads needed to be carefully measured and wound onto a special part of the loom called the warp beam.   Then, each warp thread is threaded through tiny holes in things called heddles and then through a reed. The reed helps to keep the threads evenly spaced. This part can take a little while and needs to be done carefully and patiently! First the recycled fabric strips were chosen and with the help of the teacher the strips were tied to looms and then the fun part started. Then started the fun part of weaving. Children chose the recycled fabric strips for weft threads. These ran across the width of the fabric, going in and out of the warp threads. (The weft thread is wound onto a shuttle, which is like a little boat that you pass back and forth through the raised and lowered warp threads.) Every time you pass the shuttle with the weft thread across, you use a part of the loom called the beater to gently push the new weft thread into place, making the fabric nice and tight.  Kids enjoyed the process and said it is a very focused and fun and also social activity. It’s a great way to be creative and make something beautiful with your own hands. It is also a great way to learn about the history of how people used to make their own clothes and textiles. It’s like making art with threads, and it’s a skill that people have been using for thousands of years. As in old times people used to sing during working, we were also singing old folk songs to make the workshop feel even more like traveling back in time to our ancestors. Wonderful mini “flying” carpets were made for their other project called “miniature-world”. Looms will be placed in the school hall for everyday use.    

Flying Carpets (ESTONIA) Read More »

Musical Instruments & Recycling Part 2 (ITALY)

The second meeting of the musical instruments workshop saw the introduction of new children, for whom a brief summary of the activities conducted during the previous meeting was given. In particular, the experience of playing the drums in sequence was reintroduced, starting with one stroke on each drum and continuing with two strokes alternating hands, maintaining a regular pulse. This activity allowed the children to consolidate their acquired knowledge, improving their coordination and sense of rhythm. The children also revisited the operation of the piano, exploring again the mechanism of the strings for sound production. An interesting part of the meeting was devoted to experimenting with a corrugated pipe, which, when spun, emitted a sound similar to that of a propeller flute. The children found that varying the speed of rotation of the tube changed the pitch of the sound. The conductor then introduced the sistrum, a musical instrument from ancient Rome, constructed from recycled materials: a hanger to which plastic caps were attached. The children enjoyed the creative use of materials and began to reflect on the art of building musical instruments with sustainable resources. The practical part of the meeting was devoted to instrument making. The children started making a sistrum and a clap clap, using wood that was cut by the conductor with a circular saw. While working to prepare the materials, the children also drew the plans for their instruments. Next, they sanded the pieces of wood that will make up the instruments, an activity that stimulated their manual dexterity and attention to detail. The meeting concluded with a session of ensemble music, during which the children played drums, collaborating to create a common rhythm and experiencing the value of music as a collective experience. In summary, the second meeting allowed the children to explore new instruments, consolidate practical and theoretical knowledge, and further approach the art of building recycled musical instruments. The day was full of creativity, hands-on learning and fun,.

Musical Instruments & Recycling Part 2 (ITALY) Read More »